Artful Venture Collaboration and Interview

Friday, February 13, 2015

I had the pleasure of collaborating with Artful Venture, an online boutique that specializes in selling products that were created by by artists around the globe. They partner with Arte del Mundo to encourage creativity in youth and donated part of their proceeds to the organization, you can read more about them here.


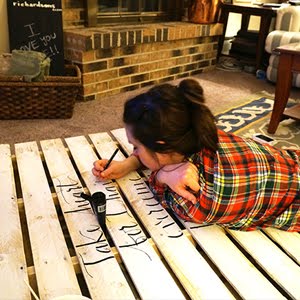
I partnered with them to paint their logo in calligraphy on a piece of wood they could use in their pop-up shops and product photos.  They wrote a nice little piece about me and my creative process over on their blog, check it out

Calligraphy Painted Wedding Signs- Part 1: Dessert Table

Friday, October 17, 2014

I am so excited to introduce you to this project!  It was a big project but such an exciting one.  A client (and new friend Heidi) contacted me through my shop to have five pieces painted for her wedding in Australia.  I initially was going to turn the project down but was so happy I said yes and cranked them all out (I always get nervous with international projects and shipping but these were a breeze! In the mail and shipped with tracking and will be there within 10 days! and it wasn't nearly as expensive as I anticipated shipping 5 pieces of wood to Australia would be).

This first piece is for their dessert table.  She left me all creative freedom to design them as I thought best and provided what she wanted each to say.  I painted calligraphy 'Love is Sweet!' and added in type at the bottom that the 'dessert table opens at 9pm'. 

I end up spending a bunch of time painting these pieces and then am sad to see them go but so happy they are off to a happy home! If you are interested in your own painted calligraphy pieces, please check out my shop. Thanks for looking!

Check out the past signs I did for this project too!
Cards for the Mr & Mrs sign
Guestbook sign 
Bar Menu
Signature Cocktail Menu

Dark Stained Mr & Mrs Signs

Wednesday, October 1, 2014

Its funny when you make something for someone and get stuck in a rut making the same thing. That is what happened with my original Mr & Mrs signs, then someone asked for them in a dark stain and I was like why haven't I ever thought to make them in a different color?! I am so thrilled with how they turned out and might even start working on a different variation soon too!
I even tried to take things one step further and think of a non-wedding way to use the signs either after your wedding or if you wanted them regardless of a wedding. I thought they would be so great hung above your/the couple's bed. If you did buy them for your wedding, it is a fun reminder of that special day you two spent together.

You can purchase your own Mr & Mrs signs here from my shop.


Signature Cocktail Menu

Wednesday, August 6, 2014

The second installment of a piece I did for a wedding back in March was a custom calligraphy painted signature cocktail menu. I stained and painted two pieces of pine that were displayed on a gold stand, fresh flowers and a candle at the bar at the reception.  The bride asked me to paint their two signature cocktails: "The Blushing Bride- Pink Champagne" and "The Gorgeous Groom- Whiskey & Coke" and we decided to would look best to emphasize the names of the cocktails in calligraphy and use an all caps type for the short description. I couldn't be happier with how it all came together. 

If you are interested in your own custom drink menu, you can purchase one through my shop
Photo by Cardin Creative


Welcome Wedding Board

Wednesday, July 30, 2014

The last piece I did for the wedding back in March was a welcome board. The board was displayed next to a picture of the couple from their engagement pictures and displayed at the entrance of their reception. The board was also displayed with lantern and fresh flowers on the top (which personally I think is the best touch!). The board measures approximately 3 feet by 2 feet and is also stained pine that was all connected on the back side. I then sketched out and painted the board in an all caps type with calligraphy to emphasize their name. This is one of the most fun pieces to make and I just loved painting the calligraphy. It all came together so beautiful and I am so proud of these three pieces. 

If you would like one for yourself, check out my shop.
If you missed the other two pieces, you can find the 'Mr & Mrs signs' here and 'Signature Cocktail Menu' here. 

Photos by Cardin Creative

Mr & Mrs Calligraphy Signs

Thursday, June 5, 2014

For the first round of a few pieces of painted calligraphy I did for a wedding back in March, I designed two of these 'Mr and Mrs' signs that were hung on the back of the bride and groom's chairs at the reception.  I put together two piece of pine that I stained and painted beautiful calligraphy on. It was so beautiful the way they came together with the lace ribbon and fresh flowers- everything complimented each other so well! Stay tuned for a couple more pieces.Signs available through my shopPhotos by Cardin Creative

Calligraphy + Watercolor Name Cards

Friday, April 25, 2014

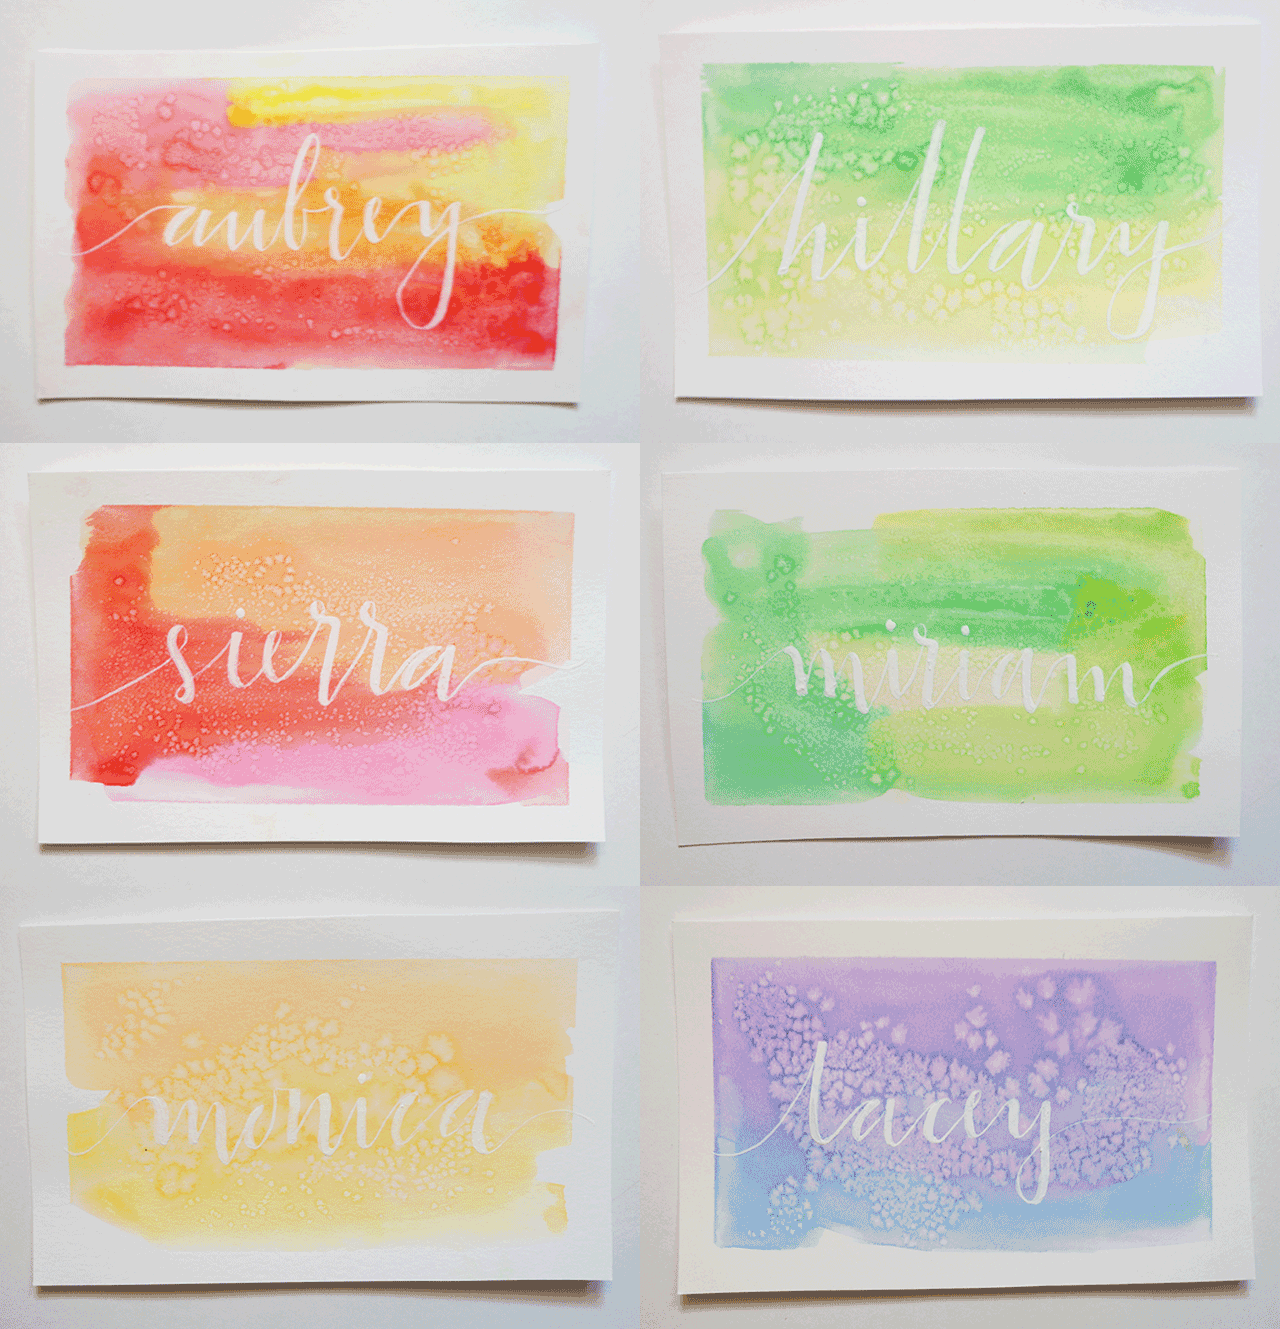
I designed a few watercolor and calligraphy name cards.  A good friend of mine, Aubrey, was hosting her first Color Workshop where she trains hair stylist in hair painting.  She basically gave me all creative control and I knew I had to do something beautiful.  I decided to add a watercolor wash to white bristol board and use white gouache to calligraphy each girls' name on top of the watercolor.  They couldn't have come together any more perfect.
Still from video by Joshua Brown Photography
Photo by Joshua Brown Photography


If you are interested in your own set of cards please message me or you can email me at amedetails{at}gmail.com.

Knitted Baby Sweater

Monday, March 31, 2014

One of Scott's cousins just had a baby girl and I had asked what she would like or need.  Her only request was something homemade.  I was so happy!  I had found this baby sweater pattern online and knew it would be perfect.  Since she was born in February, I decided to make the sweater for next fall/winter so she could get a little more use out of it then just for a month this winter/spring.  

The pattern is the Wyatt pattern on Ravelry and I could not recommend it enough.  This was my first time every knitting a piece of clothing or anything for a baby before and only had to restart about twice.  The pattern was very easy to follow and very very easy to make adjustments to if you needed to.  For example, why I love this pattern so much is not only is it unisex you could add rows in the chest area to make it longer and a dress for a little girl rather than a sweater.  They also recommend holding it up to your babe as you are knitting to get the length and arms right.  I decided to make it in a white super wash wool, or how the lady at the knitting store called it "mama friendly yarn", so that it is washable and won't shrink.  I figured that was a must when making baby clothing.  Also, she could possible use it again for another child later on.  I would highly recommend making one! Just took me a couple weeks off and on to make.


Come What May Wood Sign With Gifts By Allyson

Wednesday, March 26, 2014


I don't know if you remember our other 'come what may' wood design we did?  Well at that time I had designed two different designs and Ally just finished up the other one.  It is in a square shape instead of rectangle and is smaller so it will blend into your other decor. It is stained a pretty rich brown so the words come through the natural wood color.

Photo by Ally.
Available through my shop- we are taking custom orders!

Welcome To The New Site!

Tuesday, March 4, 2014


Hiii! Welcome to my new site! This has been a long time coming a lot of work but I am so so happy that it is ready to finally show you all!  Take a look around... I updated the look of it, added a new logo, added a whole new portfolio site that showcases all of my work, updated my Facebook page and Etsy site with my new look and there are lots of fun buttons to click on.

I have been wanting to update my site for quite awhile but it took lots of learning and researching to be able to put it all together.  I wrote out a logo awhile ago and as I went to upload it, I was unhappy with it.  So back to the drawing board and I finally came up with something I love.  My other big step (and one that probably brought me the most anxiety) was to design a line of stamps that I will be launching soon along with a giveaway (you can get a sneak peek from my shop and portfolio).

Photo from my instagram.

2013 Year In Review

Friday, January 24, 2014

This has been such a fun year for me. Over the past year I have seriously developed my skills and business into something that has been even surprising and exciting for me. Remember when I just recently posted about my Christmas cards and snuck in an example of my cards from 2013? Well, that card is the one that set off my business. A friend of my sister saw that card and asked me to help design her wedding invitations. Wow! such trust and encouragement she had in me and for that I am so grateful to her! Shortly after that, another friend asked me for a stamp design (which she wanted me to hand carve) but I had a better idea! I would try calligraphing it and have it made onto a stamp and that set off my most popular item this year. Those people near me who believe in me to help create something for them before I even believed that I could are some of the most important and treasured people to me. Now, my mind has bigger dreams and goals and I am a lot less scared then I was this time last year.  Here is some of my most proud work and my round up for 2013! (top photo from the first invitation I designed- it is amazing to see how my work has developed over the year)
The stamps were my most popular item this year and probably one of the most fun things to design.  I have had such an amazing time working with all my clients come up with something that they will love and most likely keep as heirlooms.  All of the stamps are made out of laser carved rubber and attached to a piece of wood that is engraved with the design on the top.  They also have an option for wooden handles which I think is the best part!  That stamp there in the lower right was the very first stamp I designed and am so grateful to that good friend of mine to ask for it.  You can see a feed of the stamp posts here
Earlier last year, I had a goal to calligraphy something every week to help practice and produce work.  I got a few quotes done but I will say it was all still a success and plan to calligraphy some more quotes through this year.  I did a quote my dad always says (pictured above); one from another favorite blogger, Meg Fee, who writes some of the most touching posts; and a lyric from a song my dad always used to sing me when I was young.  Here is the feed for a couple quotes I did.
I also got to design a bunch of cards and invitations.  Like I was saying above,  my first invitation suite to set everything going was Camille's (upper row on the right).  It was such a pleasure to work with her.  I learned so much and will forever be grateful for her believing in me.  Some of the other designs I did were: Brittany's Christmas Cards, Hadley's 1st Birthday Invitation, Our Christmas Cards, Randi and Michael's Wedding Invitation Suite (including two inserts), Camille's Wedding Invitation Suite (including three inserts, a program and a thank your card), Erin and Chris' Wedding Invitation Suite (included 5 inserts- one of which was a map!), Breanne's Bridal Shower Invitation, Leah's College Graduation Announcements and Lauren's Baby Shower Invitation.  Not pictured is Elise's Christmas Card.
One of my most proud projects was being approached to design a logo for a photographer (Jennifer Wanicki Photography).  I also designed a logo for my other shop that sells antlers (AME Antlers) and helped my sister redesign her hilarious blog, On Thai Time.


Speaking of good friends who believe in me... My friend Elise asked me to help design a couple signs for her wedding. Some of the big projects I did were a welcome seating sign (pictured above), a photo booth sign and my most proud was the cocktail sign.  I also worked on some smaller projects and more personal signs that were displayed throughout the wedding. 
Towards the end of the year, I started working on painted calligraphy chalkboards.  I was inspired by a gift we got when we were married almost three years ago.  I thought it would be a nice wedding gift to offer our family and friends that was personal and useful for them while also helping me practice my calligraphy in a different medium.  Those three gifts set off a chain reaction and by December I had 5 additional orders! It was so great! The first couple, I blogged about here. The last few I just finished up blogging about here. One of my favorite boards was the initial wreath I painted here.
Another fun project toward the end of the year was collaborating with Ally from Gifts By Allyson. She specializes in carved wood pieces and is able to transfer my calligraphy onto beautiful wood piece.  We made pieces for Christmas, gifts for friends and even pieces to be displayed at a wedding.
I also finally attempted calligraphy envelope design!  I have been so intimidated by it (and truthfully still am a bit) but decided to dive head first in and write out all of our friend's and family's last names on the envelopes that held our Christmas cards.  I plan to still play around with more envelopes because really they are so fun!


On a personal note, Scott and I had a great year also! We had family visit early in the year, took Wesley on his first bike ride,  took a huge road trip over the summer, did some modeling for Flora Pop!, taught Wesley to pray before his meals, made the best batch of chili over Halloween,  froze our butts off this winter, and lots of other fun things you can check out here

Overall this year has been so fun and inspiring. I have learned that there is no better time to start then now. Even though it is hard without a lot of emotional support, I learned that you have to believe in yourself and just go for it. Make the call, reach out, put it out there and you will learn what people are drawn to. The quote "You are going to wish a year from now you started today" couldn't ring more true to me and I am so happy that I started this journey. I do see everything developing and changing a lot over the next year, I mean it is so fun to see just where my work has come in one year.  I am so thankful you have joined me here in this space and followed along with me. Thank you! Thank you! 

Stay tuned! Because I have BIG news coming.  Like a couple more stamp designs, a giveaway and a new website and portfolio to reveal within a couple weeks. 

Antler Bobby Pins

Thursday, January 9, 2014

When I went home for Thanksgiving, I came bearing gifts.  I found some inspiration on pinterest and decided to make a couple pairs of antlers for my sisters and cousin and I.  They were so fun and easy to make and we had a great time sporting them.I shaped all the pins out of black oven clay and cooked them as directed.  I then sprayed them all with gold spray paint, added gold glitter to the ends and glued on a bobby pin with some tacky glue. So fun and festive for the holidays.

Calligraphy Envelopes

Wednesday, January 8, 2014

I decided to try my hand at adding calligraphy to the envelopes of our Christmas cards.  It was an effort that allowed me to practice envelope design as well as get the word out there that I love calligraphy. I knew going into this that it was going to be a HUGE project they wouldn't be perfect, I mean I had never addressed cards in calligraphy before and had no idea what I was doing, but will say I am one step closer to being a little more comfortable with the whole process.
I decided to just accent our friend's and family's last name and write in the rest of the address by hand.  I found that there is a certain type of nib that I preferred (Nikko G) and found there is a huge difference in quality of paper envelopes and ink that flows and works best for my project (I preferred Windsor and Newton Ink over Higgins).

For reference, I sent out 80 envelopes and had about a 50% rate of success... meaning that I had about 40 or so envelopes that didn't turn out.  I found in the beginning I was writing the last names starting with 'A' or 'B' quite a few times (like 6 or 7 times over).   I did get much more confident and comfortable towards the end of the alphabet and didn't need to rewrite them almost ever.  I do know that I need more practice with keeping an even flow and perfecting my up and down strokes (it takes lots of patience and is almost like learning how to write again), but I am happy that I took on this project and look forward to more like it!
What do you think of them?? If you are interested in some calligraphy for your event please contact me either through my etsy shop or via email. Thanks!

Our Christmas Cards 2013 (and 2012)

Tuesday, January 7, 2014


I really love how our christmas cards turned out this year.  The way my calligraphy matched up perfectly with the light leak of the camera.  This photo was taken back when we were in Montana, at the end of our summer vacation on my favorite hike to Woodbine Falls. The hike is so easy and quick and has the most beautiful views.  I decided to match our cards with a simple calligraphy envelope.  Envelope calligraphy and design is extremely more difficult then you would think but I will write about my very small experience with it soon. If you are interested, this is what our Christmas cards looked like last year, it is pretty amazing to see where I have come in a year and will write about my first year in calligraphy and design in an upcoming post. This card is what started it all.Thanks for looking! If you are looking for something for yourself or an event, check my listing here in my Etsy shop or send me an email!


A Collaboration With Gifts By Allyson

Friday, December 20, 2013

I am so excited to finally share this with you guys! My friend Ally with Gifts By Allyson and I teamed up to create these personalized beautiful wood and calligraphy pieces.  I provide the calligraphy and she carves it in pieces of wood that people can give as gifts and display in their homes.  Ally and I have known each other since high school and she has always been one of the sweetest people.  When I was home over Thanksgiving we had a chance to get together and have some fun projects on some beautiful wood coming in the near future! 

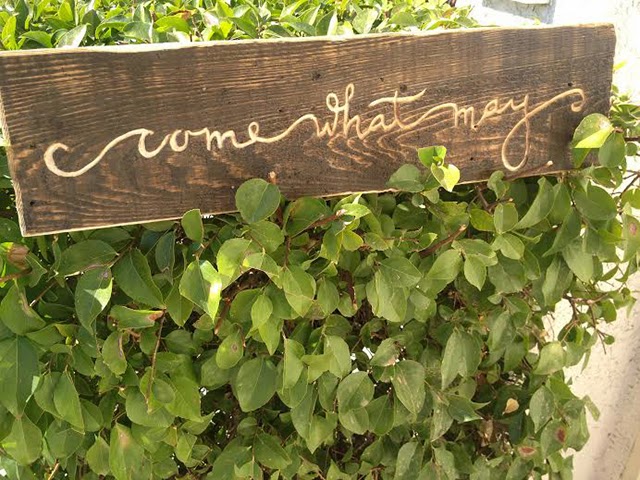
-above- our first project together. It is a piece for a bride and groom whose favorite saying is 'come what may' that we put on a long wood plank with some simple calligraphy.  We gave it to them as a gift early and they decided to also display it at their rustic themed wedding. 


-above- A custom gift for a ferried of ours to give to her family for Christmas. -below- how we wrap up our pieces once they are made and deliver to our customers.


Some holiday pieces we made together. -above- this one got to come home with me! -below- A happy customer showing us how she displayed her Merry Christmas plaque.


-above- I love this shot of our Merry Christmas plaque. We have been lucky enough to make a couple of these and just love that people love them too! This above photo is one of my favorites because it shows a little glimpse into how Ally works.
above- A customer requested a custom last name plaque for his wife for Christmas. Once he saw it he ordered another one for other family members. -below- a fun phrase that we are working on as a constant staple in a family home. 
Thanks for looking and if you are looking for your own custom piece or a replicate of one of the above pieces, check out my listings here in my shop

DIY: Use Pictures as Ornaments

Wednesday, December 18, 2013

We had some friends over the past weekend and decided to break out our new fujifilm instax camera I just bought.  We had the polaroids just laying around and our friend had a brilliant idea to clothespin them to the tree as ornaments (since we don't have many ornaments).  I love the idea of using pictures as ornaments! You could even use them at a party or a way to collect memories over the years... so fun! Photo from my instagramMerry Christmas! 

Calligraphy Christmas Cards


A good friend of mine asked me to help design a simple Christmas card for her.  I think designing cards is one of my favorite things to do.  She wanted the colors to match her daughter's sweater and it to say 'Merry and Bright' in calligraphy at the top.  She printed them on a thicker card stock on shimmer paper and think they turned out so cute! If you are looking for your own design or would like to see some others, check out my shop here.Photo by Zaira Benson. 


Calligraphy Christmas Pillow

Monday, December 2, 2013


In honor of December, I thought I would show you my friend's work. She #cantstopchristmascrafting and I have always considered her one of my most talented friends. I truly wish I lived closer to her but thankful for instagram so I get to see it all!

She borrowed my calligraphy in 'Merry' and 'Bright' from a wood project I have been working on with my friend Ally (big post on that soon!) and applied it to one of her Christmas pillows. She is so so talented and I love how it looks! Now I need to borrow her stocking example and make some of my own!

Easy DIY Pom Pom Pillow

Friday, November 29, 2013

I obviously have had an urge to change up some pillows over here (and have one more to show you!) but I thought I would show you a quick (like took me less than an hour or two) pillow update. I have a couple blank white Ikea pillow covers and have gotten a bit tired of them. I saw this pillow at Anthropologie and loved it and also knew what I would be doing to my Ikea pillow cover. I want to make this is additional colors too, but thought a classic black and white one would be perfect for us right now. 

A bit of easy math...
I first figured out how many larger stripes I wanted (three, in my case). Then I estimated how many rows of pom pom trim I would need to make the three big stripes (five smaller rows of pom pom trim to make one larger black stripe). I measured my pillow and multiplied that, in my case, times 5 (for the rows of trim) times 3 (to make the larger stripes)... and then I rounded that number up a bit because you never want to by left with not enough. I bought my trim from this etsy shop.

Sewing...
Measure where you want your larger stripes on your pillow and mark them. Since I was sewing to an already made pillow case, I started with the stripe furthest from the zipper (to get the hardest part over first). I sewed five rows of trim (with coordinating color thread) in the vicinity of my marked line, making sure to sew the trim as close as possible to each other. I repeated sewing five rows of trim in the middle and then again closer to the zipper. Done.

If you were making a case from scratch, I would recommend cutting out your fabric in the size you want as the pillow cover; marking the place where you want the stripes; sewing your trim to the front of your fabric (this part you will find much easier compared to sewing to an already made case) and then sewing three sides closed to make your case, closing off with a zipper or a fold. 


How to: Knit Pillow

Tuesday, November 26, 2013

We had a pillow form an odd size and I wasn't a huge fan of the original cover so after seeing all the inspiration for knitted pillows I decided to give it a shot myself. I originally wanted this to be in a grey (and still might do it) but couldn't find the yarn and desired to go with a mustard yellow since it is a universally pleasing color as a pillow and compliments most of my bedding.

I tried to make this pillow a couple different ways before just settling on the easiest. 

First try- I used giant knitting needles (size US 35- 19mm) with the yarn (Patons Wool Roving Yarn) and it produced too much of an open knit and any tug on the case would make it not look neat. I still want to use those needles to knit something beautiful but I need to find much larger yarn or roving to to so. 

Second try- I decided to knit the first long side and link the ends as I worked my way knitting the second long side (potentially eliminating the need to close the seems and producing a case by the end of all my knitting). This sounds confusing just typing it and it just didn't work- I don't recommend trying it. 

Third try-  I undid the attempt to link the side together and kept the first long piece I knitted. This piece measured to be one side of the length of the pillow. I then decided to switch things up (to keep the project interesting) and created a different pattern for the second half (or other side of the pillow). I did a knit, purl, knit, purl etc. to create this cross shape pattern shown below. I found that you had to keep track a bit, because when you got to the end of the row, you had to start with that same stitch you finished off with. For example, if my row ended on purl, I had to start with the purl stitch for my new row to keep the pattern looking right.  Once the second half was the same length as the first I finished it off and added four monkey fists/ sailor's knot to close the pillow. These were pretty difficult to make with this yarn, don't hold up well and probably wouldn't do them again but it was fun to learn something new (and, well, as you can see I used them anyways). 

In the end, I used two skeins of the yellow Patons Wool Roving Yarn with a set of size 13 or 9mm knitting needles to make a pillow measuring 22 inches by 15 inches. For any pillow project, I find the easiest way to knit a rectangle twice as long as your pillow so all you have to do is fold it in half and close up the three sides. Of course you can do it in two squares or rectangles, too, and close up the four sides. 
If you have any questions or try it let me know!

AMEdetails All rights reserved © Blog Milk Powered by Blogger